
A technical look at project modes, brand systems, editable HTML, media generation, preview sandboxes, exports, and design safety guardrails
Most AI design tools are either image generators or slide generators.
They can make something visually impressive, but the output is often hard to edit, hard to reuse, hard to export properly, or disconnected from the rest of your workflow.
For a personal AI assistant, design should work differently.
It should be part of the same local-first system that already understands your projects, files, brand, tasks, memory, and workflows.
That is the idea behind Row-Bot Designer Studio.
Designer Studio is Row-Bot’s AI-assisted visual content creation system. It is built to create branded, editable, previewable, and publishable visual content across multiple formats.
Row-Bot is a local-first desktop AI assistant for doing real work with models, memory, and tools. It includes Designer Studio, a personal knowledge graph, workflows, browser automation, shell access, messaging channels, voice, vision, and provider-aware model routing. (Source:https://github.com/siddsachar/row-bot)
The Row-Bot website describes it as a desktop AI workbench with Designer Studio, Developer Studio, Skills Hub, Custom Tools, memory, workflows, MCP tools, and local-first model routing. (Source:https://row-bot.ai)
This article explains how Designer Studio works under the hood.
The goal of Designer Studio
The goal is not just to generate a pretty picture.
The goal is to generate structured visual content that can be:
- Branded
- Edited
- Previewed
- Critiqued
- Repaired
- Exported
- Published
- Reused
- Stored locally
That means Designer Studio has to think more like a design runtime than a one-shot image model.
It needs to understand:
- What kind of project the user wants
- Which canvas rules apply
- What brand system should be used
- How many pages or screens are needed
- Which assets belong to the project
- How the layout should behave
- Whether content is clipped
- Whether text is readable
- Whether the output can be exported cleanly
That is what the architecture is designed to support.
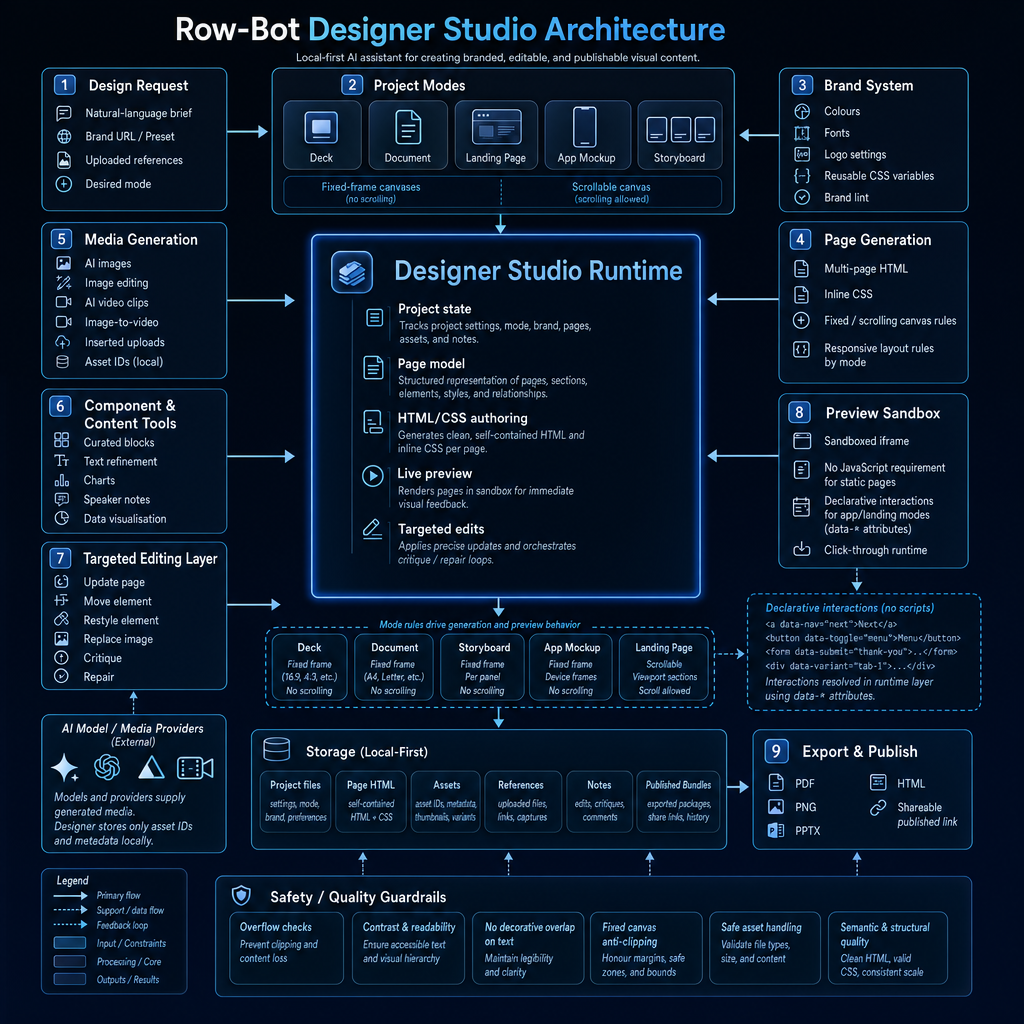
High-level architecture
The Designer Studio architecture flows through several layers:
- Design Request
- Project Modes
- Brand System
- Designer Studio Runtime
- Page Generation
- Media Generation
- Component and Content Tools
- Targeted Editing Layer
- Preview Sandbox
- Local-First Storage
- Export and Publish
- Safety and Quality Guardrails
The central piece is the Designer Studio Runtime.
This runtime manages project state, page models, HTML and CSS generation, live preview, targeted edits, and critique or repair loops.
1. Design Request
Everything starts with a design request.
The user can provide:
- Natural-language brief
- Brand URL or preset
- Uploaded references
- Desired mode
A request might look like:
Create a pitch deck for a local-first AI assistant.
or:
Make a landing page for this product using my brand colours.
or:
Turn this idea into a mobile app mockup.
The important thing is that Designer Studio does not treat every request as the same kind of output.
The first step is understanding what type of visual artifact is being created.
That leads into project mode selection.
2. Project Modes
Designer Studio supports multiple project modes:
- Deck
- Document
- Landing Page
- App Mockup
- Storyboard
Each mode has different layout rules.
This is one of the most important design choices in the system.
A slide deck is not a landing page.
A storyboard is not a document.
An app mockup is not a poster.
If the same layout logic is used for every format, the output quickly breaks.
Designer Studio uses mode-specific rules so each format behaves correctly.
Fixed-frame canvases versus scrollable canvases
The architecture separates projects into two major canvas types.
Fixed-frame canvases
These include:
- Decks
- Documents
- Storyboards
- App mockups
Fixed-frame canvases do not scroll.
That means content must fit inside a defined frame.
For example:
- A 16:9 deck slide
- An A4 document page
- A phone-sized app screen
- A storyboard frame
In fixed-frame modes, overflow is a serious issue.
If content goes outside the canvas, it gets clipped.
Designer Studio has to manage spacing, content budgets, font sizes, margins, and safe zones.
Scrollable canvases
Landing pages are different.
They can scroll.
A landing page can have sections such as:
- Hero
- Features
- Pricing
- Testimonials
- FAQ
- CTA
- Footer
The layout rules are more like responsive web design.
This distinction lets Designer Studio generate more reliable output for each content type.
3. Brand System
The Brand System supplies visual constraints.
It can include:
- Colours
- Fonts
- Logo settings
- Reusable CSS variables
- Brand lint
This matters because generated design often looks generic unless it is constrained by a brand system.
Designer Studio can use brand tokens to keep visual identity consistent across pages.
For example:
–primary –secondary –accent –bg –text –heading-font –body-font
A project can then reuse those variables across every page.
This makes the output more coherent and easier to restyle.
Brand lint also helps detect issues such as contrast problems, off-brand colours, and missing visual consistency.
Designer Studio Runtime
The central runtime is where the main orchestration happens.
It manages:
- Project state
- Page model
- HTML and CSS authoring
- Live preview
- Targeted edits
This is the difference between Designer Studio and a simple image generator.
Designer Studio is not just making one static output.
It is maintaining an editable project.
Project state
Project state includes:
- Project settings
- Mode
- Brand
- Pages
- Assets
- Notes
This allows the system to keep track of the design as it evolves.
If the user says:
Make slide 3 darker.
or:
Replace the hero image.
or:
Export this as PDF.
The runtime needs to know the current project state.
It needs to understand pages, assets, mode, and brand.
This makes editing possible.
Page model
The page model represents the structure of the design.
It includes:
- Pages
- Sections
- Elements
- Styles
- Relationships
This is important because design editing should be targeted.
A user should be able to say:
- Move this element
- Restyle the heading
- Replace the image
- Add a chart
- Remove this section
- Fix overflow
- Shorten the paragraph
Without a page model, the system would have to regenerate everything from scratch.
With a page model, it can apply smaller edits.
That makes the workflow more controllable.
HTML and CSS authoring
Designer Studio outputs self-contained HTML with inline CSS.
This is a practical choice.
HTML and CSS are:
- Editable
- Previewable
- Exportable
- Portable
- Easy to inspect
- Flexible across formats
- Suitable for decks, documents, landing pages, mockups, and storyboards
Instead of producing only pixels, the system produces structured layouts.
That means the user can revise content and styling without starting over.
It also makes exports more practical.
4. Page Generation
Page Generation handles the rules for creating pages.
It covers:
- Multi-page HTML
- Inline CSS
- Fixed or scrolling canvas rules
- Responsive layout rules by mode
For example:
A deck page should behave like a fixed slide.
A document page should respect paper-like boundaries.
A landing page should be responsive and scrollable.
An app mockup should fit a device viewport.
A storyboard should manage shot visuals, captions, and direction notes.
These mode rules prevent the common AI design failure where everything looks fine in isolation but breaks in the target format.
5. Media Generation
Designer Studio can use AI media generation and inserted assets.
The architecture includes:
- AI images
- Image editing
- AI video clips
- Image-to-video
- Inserted uploads
- Local asset IDs
External AI model and media providers can generate assets, but Designer Studio stores asset IDs and metadata locally.
This keeps the project structure local-first while still allowing optional external generation when the user chooses.
For example, the user might ask:
Generate a futuristic hero image for this landing page.
or:
Add a product video to the storyboard.
The generated media becomes part of the project’s asset system.
6. Component and Content Tools
Designer Studio also includes content tools such as:
- Curated blocks
- Text refinement
- Charts
- Speaker notes
- Data visualisation
This is important because design work is not only visual.
A useful design assistant needs to help with:
- Copy
- Structure
- Visual hierarchy
- Data presentation
- Speaker notes
- Charts
- Reusable sections
For example:
- Add a pricing section
- Turn this paragraph into bullets
- Add a stats band
- Generate speaker notes for this slide
- Create a bar chart from this CSV
- Add a testimonial block
This makes Designer Studio more like a full content creation surface.
7. Targeted Editing Layer
The Targeted Editing Layer supports precise changes.
It can handle:
- Update page
- Move element
- Restyle element
- Replace image
- Critique
- Repair
This is one of the most useful parts of the system.
AI design tools often fail because every edit becomes a full regeneration.
Full regeneration causes drift.
The design may change too much.
The layout may lose its original structure.
The brand may become inconsistent.
Targeted editing avoids that.
If the user says:
Make the heading smaller.
Designer Studio should not redesign the whole slide.
If the user says:
Replace the image on page 2.
It should not rewrite the entire deck.
This makes the design workflow much closer to working with an actual editor.
Critique and repair loops
Designer Studio can critique pages and apply repairs.
This helps catch problems such as:
- Overflow
- Poor spacing
- Low contrast
- Weak hierarchy
- Text clipping
- Decorative overlap
- Unreadable layouts
The system can identify problems and then apply safe deterministic fixes or regenerate only the affected parts.
This is important because AI-generated layouts can look good at first glance but fail under real design constraints.
Critique and repair loops make output more production-ready.
8. Preview Sandbox
The Preview Sandbox renders designs in an isolated environment.
It uses:
- Sandboxed iframe
- Static HTML and CSS
- Declarative interactions for app and landing modes
- Click-through runtime
The sandbox lets the user review the design before exporting or publishing.
This is especially useful for:
- App mockups
- Landing pages
- Interactive flows
- Multi-page designs
The preview layer is not just visual. It is part of the safety and quality model.
It lets the system inspect how the design actually renders.
Declarative interactions instead of scripts
For landing pages and app mockups, Designer Studio supports declarative interactions.
The diagram shows examples like:
<a data-nav=”next”>Next</a> <button data-toggle=”menu”>Menu</button> <form data-submit=”thank-you”>…</form> <div data-variant=”tab-1″>…</div>
The idea is that interaction is expressed through data-* attributes.
The runtime handles the behaviour.
This avoids injecting arbitrary custom scripts into the preview.
That is a good safety and maintainability choice.
For simple prototypes, you often do not need full JavaScript.
You need clickable flows, toggles, variants, and navigation.
Declarative interactions are enough for many app and landing page mockups.
Mode rules drive preview behaviour
The mode rules strip defines how each project type behaves:
Deck
- Fixed frame
- 16:9, 4:3, etc.
- No scrolling
Document
- Fixed frame
- A4, Letter, etc.
- No scrolling
Storyboard
- Fixed frame
- Per panel
- No scrolling
App Mockup
- Fixed frame
- Device frames
- No scrolling
Landing Page
- Scrollable
- Viewport sections
- Scroll allowed
These rules guide both generation and preview.
They also guide guardrails.
A content overflow issue in a deck is serious.
A long scroll in a landing page may be normal.
The mode determines what “good” means.
Storage is local-first
Designer Studio stores project data locally.
The storage layer includes:
- Project files
- Page HTML
- Assets
- References
- Notes
- Published bundles
Project files include settings, mode, brand, and preferences.
Page HTML includes self-contained HTML and CSS.
Assets include IDs, metadata, thumbnails, and variants.
References include uploaded files, links, and captures.
Notes include edits, critiques, and comments.
Published bundles include exported packages, share links, and history.
This gives the user persistent ownership of the work.
Design projects are not just temporary generations.
They are local artifacts that can be edited, exported, and reused.
9. Export and Publish
Designer Studio can export or publish projects in several formats:
- PNG
- PPTX
- HTML
- Shareable published link
This is where structured output pays off.
Because the project is represented as editable HTML and CSS, it can be converted into different delivery formats.
Examples:
- Deck exported as PDF or PPTX
- Landing page exported as HTML
- App mockup published as a click-through prototype
- Storyboard exported as PNG frames or PDF
- Document exported as PDF
The goal is to move from prompt to usable deliverable.
Safety and Quality Guardrails
Across the bottom of the architecture are the safety and quality guardrails.
These include:
- Overflow checks
- Contrast and readability
- No decorative overlap on text
- Fixed canvas anti-clipping
- Safe asset handling
- Semantic and structural quality
This is one of the most important parts of Designer Studio.
AI-generated design can fail in subtle ways:
- Text spills outside the slide
- Buttons overlap
- Decorative shapes cover headings
- Contrast is too low
- Images cover important content
- A fixed frame clips the footer
- Layouts are visually nice but structurally invalid
Guardrails help prevent these failures.
They make the output more dependable.
Why no decorative overlap matters
This sounds like a small detail, but it matters a lot.
AI-generated layouts often place decorative shapes, blobs, illustrations, or gradients over text.
It looks creative, but it kills readability.
Designer Studio’s guardrails explicitly protect text.
Decorations should support content, not fight it.
This is the kind of rule that makes generated design more usable.
Why overflow checks matter
Overflow is one of the most common problems in AI-generated visual content.
A model may generate a beautiful slide, but if the slide is fixed at 16:9 and the content exceeds the canvas, the export clips it.
That is unacceptable for production output.
Designer Studio treats overflow as a first-class issue.
In fixed-frame modes, content must fit.
If it does not, the system needs to repair it, shrink it, simplify it, or split it into more pages.
Safe asset handling
The system also needs to handle assets safely.
That includes:
- Uploaded references
- Generated images
- Generated videos
- Thumbnails
- Variants
- Local metadata
Asset handling matters because design projects often mix local files and external generated media.
The system needs to track which asset belongs where and avoid unsafe or broken references.
Using asset IDs and metadata helps keep projects portable and manageable.
Why Designer Studio is different from image generation
Image generation is useful, but it is not the same as design tooling.
An image generator produces pixels.
Designer Studio produces editable projects.
That means:
- The layout has structure
- Text can be refined
- Elements can be moved
- Images can be replaced
- Charts can be inserted
- Pages can be reordered
- Brand can be updated
- Exports can be generated
- The project can be stored locally
This is the difference between “make me an image of a slide” and “build me a slide deck I can edit”.
For real workflows, that distinction matters.
Why this belongs inside a personal AI agent
A standalone design generator can be useful.
But putting Designer Studio inside Row-Bot makes it more powerful.
The assistant can use:
- Project memory
- Brand preferences
- Uploaded documents
- Research results
- Generated images
- Charts
- Task workflows
- User writing preferences
- Prior conversations
- Local files
For example, Row-Bot can:
- Research a topic
- Summarise findings
- Turn the research into a deck
- Generate matching visuals
- Apply brand styling
- Add speaker notes
- Critique the slides
- Repair overflow
- Export the deck
- Send or publish it if the user approves
That is a full workflow, not a single generation.
Example: creating a pitch deck
A pitch deck workflow might look like this:
- User gives a natural-language brief
- Designer Studio selects deck mode
- Brand system applies colours and fonts
- Runtime creates project state and page models
- Page generation creates multiple slide pages
- Media generation adds visuals
- Component tools add stats, charts, and callouts
- Preview sandbox renders the deck
- Critique checks overflow and readability
- Repairs are applied where needed
- The user reviews the result
- The deck is exported as PDF or PPTX
This is much more structured than “generate a slide image”.
Example: creating a landing page
A landing page workflow is different.
The mode rules allow scrolling.
The runtime creates sections rather than fixed slides.
The output may include:
- Hero
- Feature blocks
- How it works
- Pricing
- Testimonials
- FAQ
- CTA
- Footer
The preview sandbox can support declarative interactions and navigation.
The export can be HTML or a shareable published link.
This is why mode-specific rules are necessary.
A landing page should not be constrained like a slide deck.
Example: creating an app mockup
An app mockup needs device-like constraints.
The system needs:
- Fixed viewport
- Route or screen structure
- Click-through navigation
- Inner scroll areas where needed
- Declarative interactions
- Consistent UI components
The output is not just a static screenshot.
It can become a clickable prototype.
This is useful for early product thinking, UI exploration, and design communication.
The developer takeaway
If you are building AI design tools, I think the key lesson is this:
Design generation should not stop at pixels.
A useful system needs:
- Project modes
- Canvas rules
- Brand tokens
- Structured page models
- Editable HTML and CSS
- Asset tracking
- Targeted edits
- Preview sandboxing
- Declarative interactions
- Export pipelines
- Local storage
- Quality guardrails
That is the difference between a visual toy and a workflow tool.
Final thoughts
Designer Studio is Row-Bot’s approach to AI-assisted visual content creation.
The goal is not to replace design tools.
The goal is to make the assistant capable of producing structured, branded, editable, and exportable visual artifacts as part of a larger local-first workflow.
It can create decks, documents, landing pages, app mockups, and storyboards.
It can use brand rules, generate media, add charts, refine text, preview output, apply critiques, repair layouts, and export deliverables.
Most importantly, it treats design as a persistent project, not a disposable image.
That is where I think AI design tooling needs to go:
from generation to editable systems.
Links
Row-Bot GitHub repository:
https://github.com/siddsachar/row-bot
Row-Bot website:
Leave a Reply